

Notion has significantly transformed my approach to collaborating with clients on freelance projects. In addition to providing me with a means to monitor my progress and efficiently manage my tasks, it has also enabled me to showcase my achievements to my clients in a manner that consistently impresses them and enhances my professional image.
What is the most outstanding aspect? I refuse to pay any amount for any of this. Notion’s free plan allows for all of this, creating a unique circumstance where you can generate income without spending any money.
Today, I will disclose my methodology that I consistently employ while collaborating with a customer. This technique consistently impresses me and greatly assists me in distinguishing myself. It seems that the majority of freelancing assignments mostly take place through email threads, which can rapidly become difficult to handle and result in exchanges such as “where was that link you mentioned earlier?” or “what is the current status of X?” flowing back and forth. By utilizing my Notion arrangement, you can permanently eliminate those emails and streamline your work by having a single source of accurate information, ensuring that everyone is well-informed and aligned.
The Scenario
Illustrating with a practical case rather than a fabricated one, I will demonstrate the specific approach I employed for a recent client, who expressed great satisfaction with my work. This will facilitate a more comprehensible discussion. The names have really been altered, but the initiative we developed is authentic.
I was contracted to develop a series of presentations for a corporation, which would be presented by their sales team. I was required to generate a comprehensive plan for each presentation, develop a slide deck based on that outline, and subsequently record myself delivering the presentation. Several issues became apparent right away if we were to utilize an only email-based framework for executing this project:

Each presentation would involve multiple steps, with responsibilities being exchanged between me and the customer.
Due to the numerous presentations, there were a multitude of statuses that needed to be monitored.
Every presentation was accompanied by several additional files.
Overall, there would be numerous complex components that would be challenging to monitor solely through email correspondence. This was an ideal candidate for Notion.
My Basic Notion Structure
To begin, I must create a new workspace in Notion. If the project is not highly classified, I like to create public workspaces. This allows me to easily share a link with the customer, granting them access to the project board. This implies that your clients are not required to possess or generate a Notion account; they may effortlessly observe the current status of affairs.
If your project requires confidentiality, you can establish a private workplace and selectively invite only the necessary individuals. This method provides enhanced security measures, however, it necessitates that your client establishes a personal Notion account in order to access the system. While this approach offers enhanced security, it also requires the client to undertake additional tasks, resulting in a trade-off.
After creating the workspace, I proceed to assign it a name and then choose a personalized icon and banner image for the company I am collaborating with. I find that this approach adds a personal touch to the project, creating a sense of exclusivity and exceptional service.
Ultimately, we must choose a method to present the information from the workspace, and I believe that using a “board” is the most optimal choice. Currently, I have established a project website that incorporates the client’s identity and includes temporary tasks displayed on a rudimentary Kanban board. We are not yet prepared to disclose this information to the client, but, you can obtain the URL by:
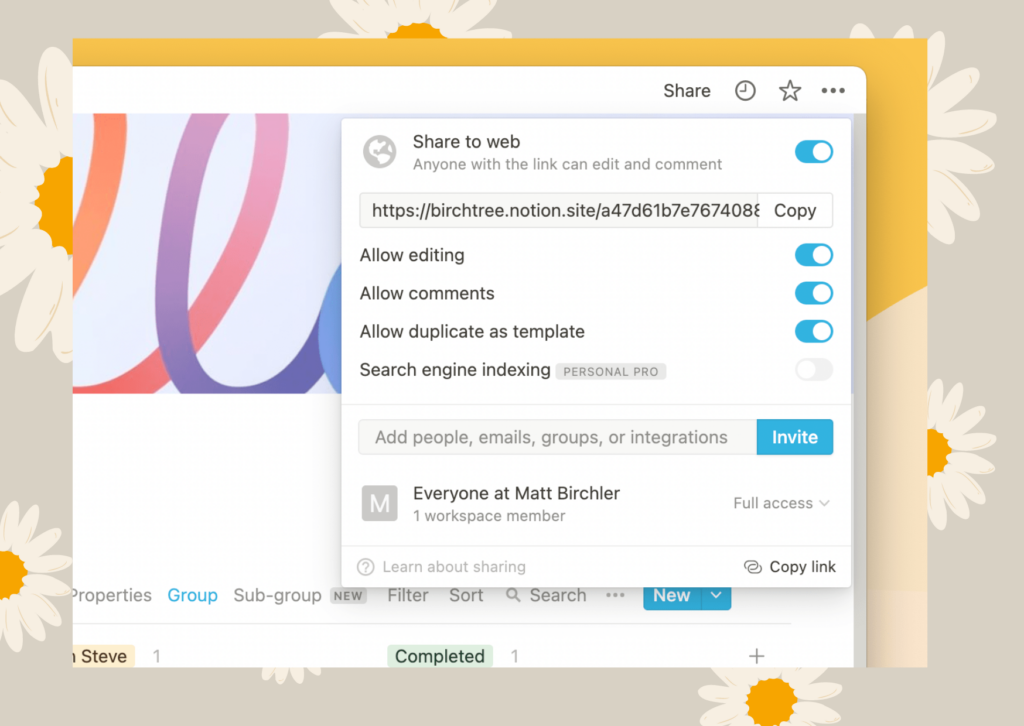
- Clicking Share in the top right of Notion.
- Turn on Share to Web.
- (Recommended) Turn on the ability to add comments.
- (Recommended) Turn on the ability to edit.
- Copy the link.
While items 3 and 4 on the list are not mandatory, I highly advise activating them. Both options necessitate the client to create a Notion account. However, even without an account, they may still access the page. If they do create an account, it enables them to write numerous comments or make changes to assignments directly within Notion. This diminishes the necessity of doing these actions via email, which aligns with the intended objective.
Creating Tasks for Your Project
The specifics of your tasks may vary from mine, but the advantage of using Notion is that this is completely acceptable. Ensure that you now have Card 1, 2, and 3 displayed on your board. Proceed by selecting one of the cards and commencing the process of modifying its details.
Each card in Notion possesses attributes, which can represent various types of information. By default, cards will include an assignee and a state. If you are collaborating with someone who does not have a Notion account, there is no requirement for an assignee. Therefore, you can promptly eliminate that particular feature. For now, let’s set aside the concept of “status” and focus on incorporating our own specific attributes.
A property in Notion refers to a value that you intend to store, and it might encompass a wide range of possibilities. Possible choices encompass:
Text
Number
Select
Multi-select
Date
Person
Files
Checkbox
URL
Email address
Phone number
Formula
Relationship
Created Time (and user who created)
Edited Time (and user who edited)
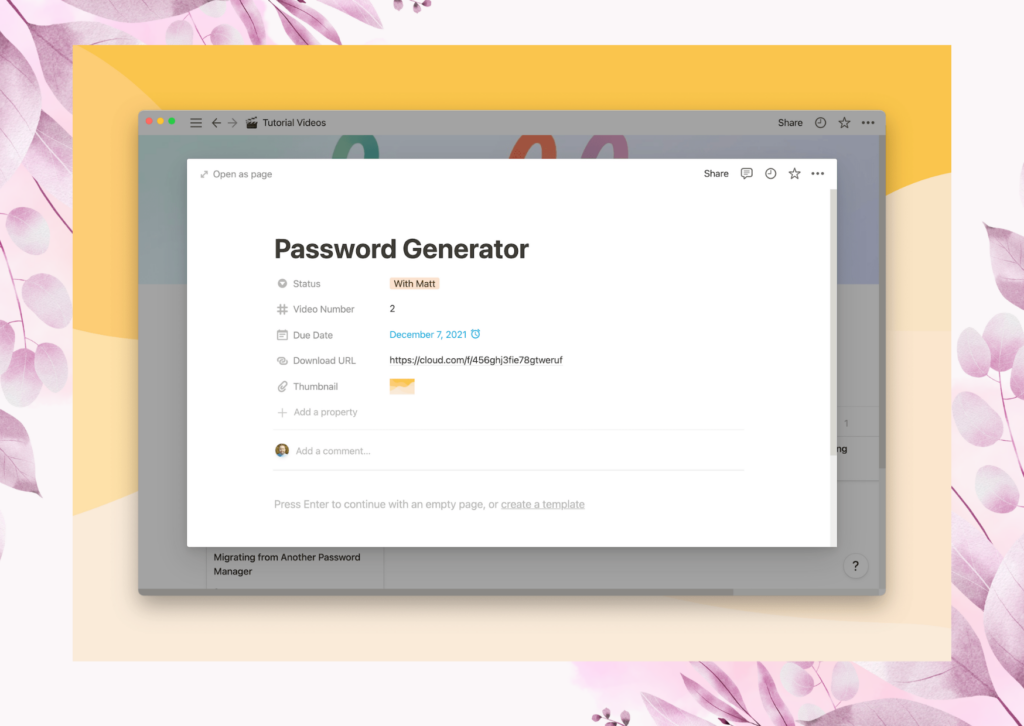
There are other alternatives available, but the ones highlighted in bold in the following list are the ones you are most likely to find useful. To facilitate communication, I prefer using concrete illustrations. Therefore, I will provide a list of characteristics that I recently employed for a video undertaking, in which I produced content for a third-party’s YouTube channel:
- Date property with the agreed-upon due date for when I would deliver that video. Date fields also support alerts, so I was able to set an alert for the day before the video was due to remind myself to wrap everything up if I had not already.
- Number property with the number of the video in the series. We were working on 6 videos and it was good to be able to refer to “video 2” instead of “the video where you talk about X” in general communication.
- URL property with a link to OneDrive where I was storing the final versions of the videos. Notion makes URL fields clickable, so they were able to just click the link in Notion to open the download page in their web browser.
- Files property where I uploaded the thumbnail for the video. This was a simple JPG image, so nothing too fancy here.
- Text property with the title of the video I suggested they use on YouTube.
- Text property with the description I suggested they use on YouTube.
In another project, I was creating videos and slide decks for each task (card) and so I have a URL property for the video download, as well as a second URL property for the Google Slides deck that I created for them.
In another project, I utilized a select property to generate a dropdown menu containing choices for support, sales, and marketing. This was done to tailor the content I was creating for specific audiences. By assigning each card to a particular audience, the client could easily determine the intended target for each item they were viewing.
Additionally, each of these cards contains a comprehensive document that you may generate under your control. This allows you to perform a wide range of tasks, like taking notes and composing articles with sophisticated formatting. It provides ample freedom to pursue one’s desires without any constraints.
Setting Your Statuses
Having determined the content to be saved on each card/task in your project, it is now necessary to establish certain statuses. The aforementioned categories are displayed at the top of the board, and currently, you should find the labels “Not started,” “In progress,” and “Completed” in that location. Modifying these elements is straightforward, as you can effortlessly click on their respective names to alter their labels, and click on the three dots adjacent to each element to modify its color.
The statuses you establish are of utmost significance in facilitating your client’s comprehension of the project’s current state, and the default statuses Notion sets are decent, but I recommend modifying one and incorporating another to get a truly robust solution for most scenarios.
Personally, I consistently modify the status to “With Matt” while a task is in progress, indicating that it is my responsibility to take action. Next, create a new status by scrolling to the right and selecting “Add a group”. Name this status “With Steve” (or the name of your client). Move the new status to the right of your name, “With Matt,” and you will have a well-organized board.
That is an elementary Kanban board, and it has effectively fulfilled its purpose for numerous projects. Although it is straightforward, I find it to be beneficial when collaborating momentarily with someone. In my primary occupation, we utilize a significantly more intricate board that encompasses a greater number of regulations and optimal methods. However, due to our constant engagement with it, we have assimilated its contents and processes. It is important to keep in mind that as a freelancer, your goal is to simplify your clients’ lives. Requesting them to familiarize themselves with a complex system and its regulations will not enhance their satisfaction with the experience. Using this tool, individuals can access the board and examine if there are any items located beneath their specific column. If a certain condition exists, take action; otherwise, there is no cause for concern.
Typically, I independently transfer cards to the appropriate status on my own. Subsequently, I send an email to the customer notifying them of the relocation and prompting them to review the contents of their column. If the client creates their own Notion account, you will be able to mention them using the @ symbol in comments when you change the status of cards assigned to them. While it is pleasant when such occurrences take place, it is certainly not a guarantee with every client.
Bringing It All Together
Now, the task at hand is simply to generate your tasks as cards on the board and place them in the appropriate state, most likely “Not started” at this moment. Complete any available properties at this time, but do not be concerned if most of them are empty. You may be engaged in a task that requires filling in these properties gradually.
Now simply share the URL you already generated with the client, and relish in creating a favorable initial impression as they provide feedback on the professionalism of your setup. Now it is your responsibility to fulfill their expectations, but you are quite capable of accomplishing it. Just go and complete the task.